Sally Hansen Diamond Shine
I was looking for a drug store top coat, which would delay the eventual nail chipping and helped it dry real fast. I was fed up with smudged nail paint.
This is when I turned to twitter and just like on all previous occasions( pram, vacuum cleaner) the suggestion from my twitter friends didn’t fail me.
Val was the first to recommend Sally Hansen Diamond Shine and it was soon seconded my many others. And, they were spot on about it. This is a drug store gem.

I wore this first on Savvy Orange Envy, a nail paint which doesn’t claim anything about ‘no nail chipping’ or how long the manicure last. Do you want to see how Sally Hansen performed??
Day 1:

Day 5:

Even after 5 days, there is tiny wear on nail tip with slight chipping. This itself was enough to convince me about Sally Hansen Diamond Shine claims, you know proof lies in the pudding.
The shine which this imparts to any nail polish is exquisite. Every single time I have used it, it looks like I had a professional manicure done. And if this wasn’t enough, this gem from Sally Hansen helps my nail paint dry really fast.
My only gripe is the packaging. With black bodied bottle, I just don’t know when I need to get a new one.
But, all aside, I love this beauty. I am already on my 3rd bottle and will definitely be stocking on more.
Do you girls have a go-to top coat?
Festive Eyelook for Diwali
Diwali is one of the most important festival in India. Festivities are planned on scale similar to Christmas. Everyone plans on food, gifts, party etc but few beauty crazed people think about the makeup they would be wearing for Diwali party 😉
And this is what I plan to do, a warm jewel toned eye look

I started with NARS Smudgeproof as the primer, followed by MAC Tan pigment all over the eyelid. Since I don’t get to use MAC pigments on regular basis, this was a good chance to have some play with them. It’s a beautiful rose gold colour.

As the next step, I applied MAC Blue Brown pigment in the outer 2/3rd part of the eye. There was fall out but it can be minimised by using a flat dense eye brush. This is such a gorgeous pigment , beautiful duochrome. In this look, since I have used a rose gold color as base, the pigment looks more brown then blue.

To give more depth to the look, I used MAC Foley and Embark eyeshadow as the socket colour. The key at this step is blending. Blend it enough to soften the line, yet keep the distinct colours visible
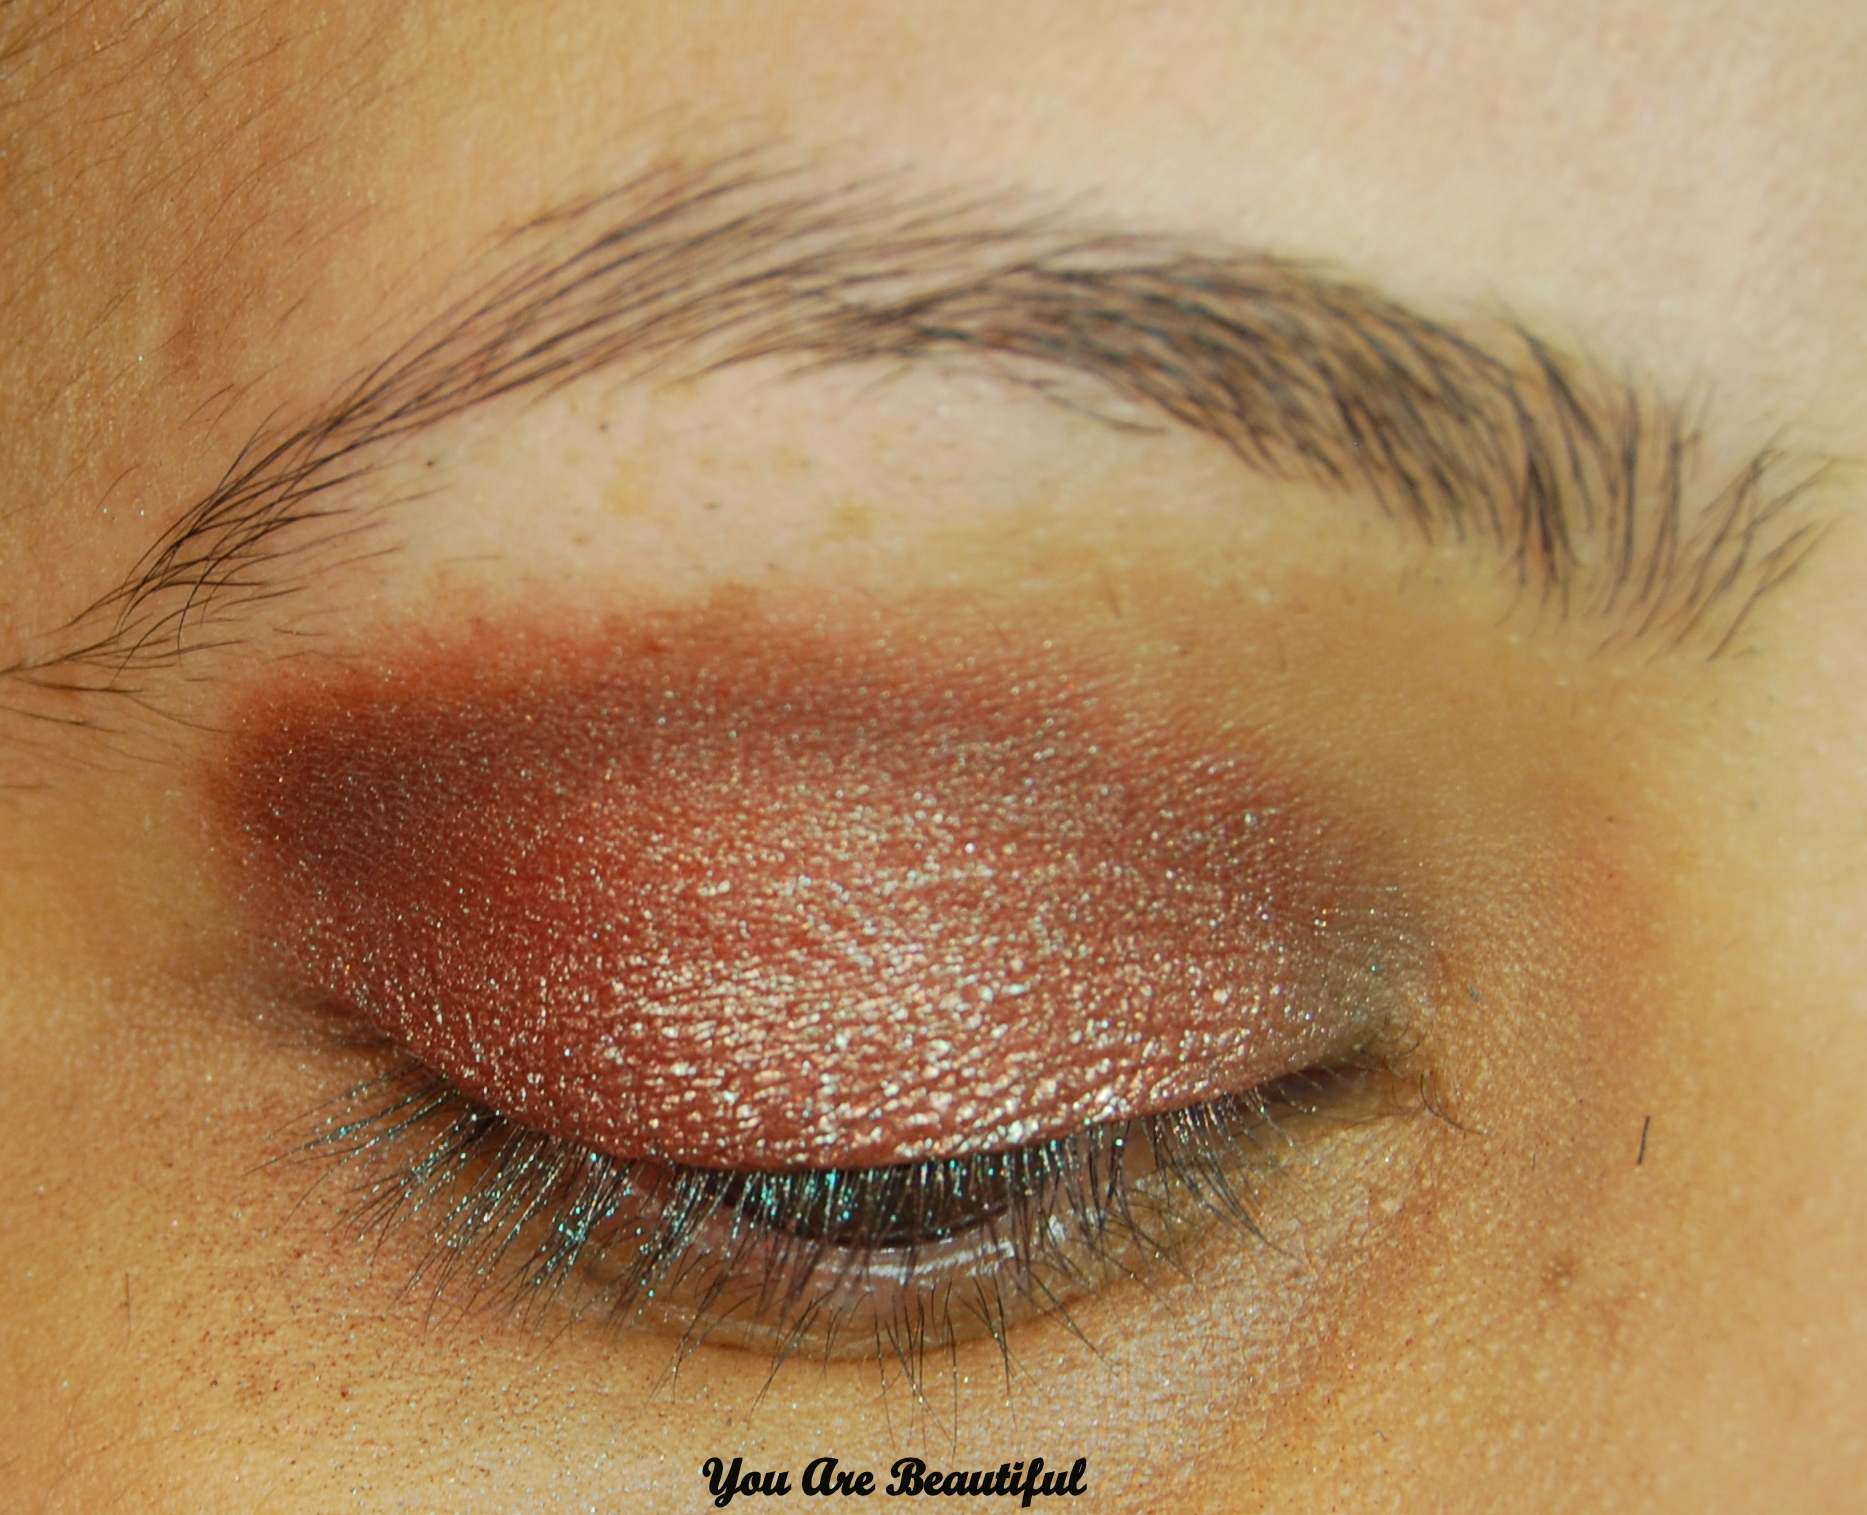
Using MAC Carbon as the outer corner colour adds that extra depth to the look. My favourite brush for this is Artiste dome shaped smudge brush. Its dense and pointed, so color application is precise avoiding the racoon effect.

I finished the look with Loreal gel eyeliner, Milani Liquif’ye in Black on water line. On my lower lash line, I applied MAC Twink using an angle brush.

Products used
Swatches
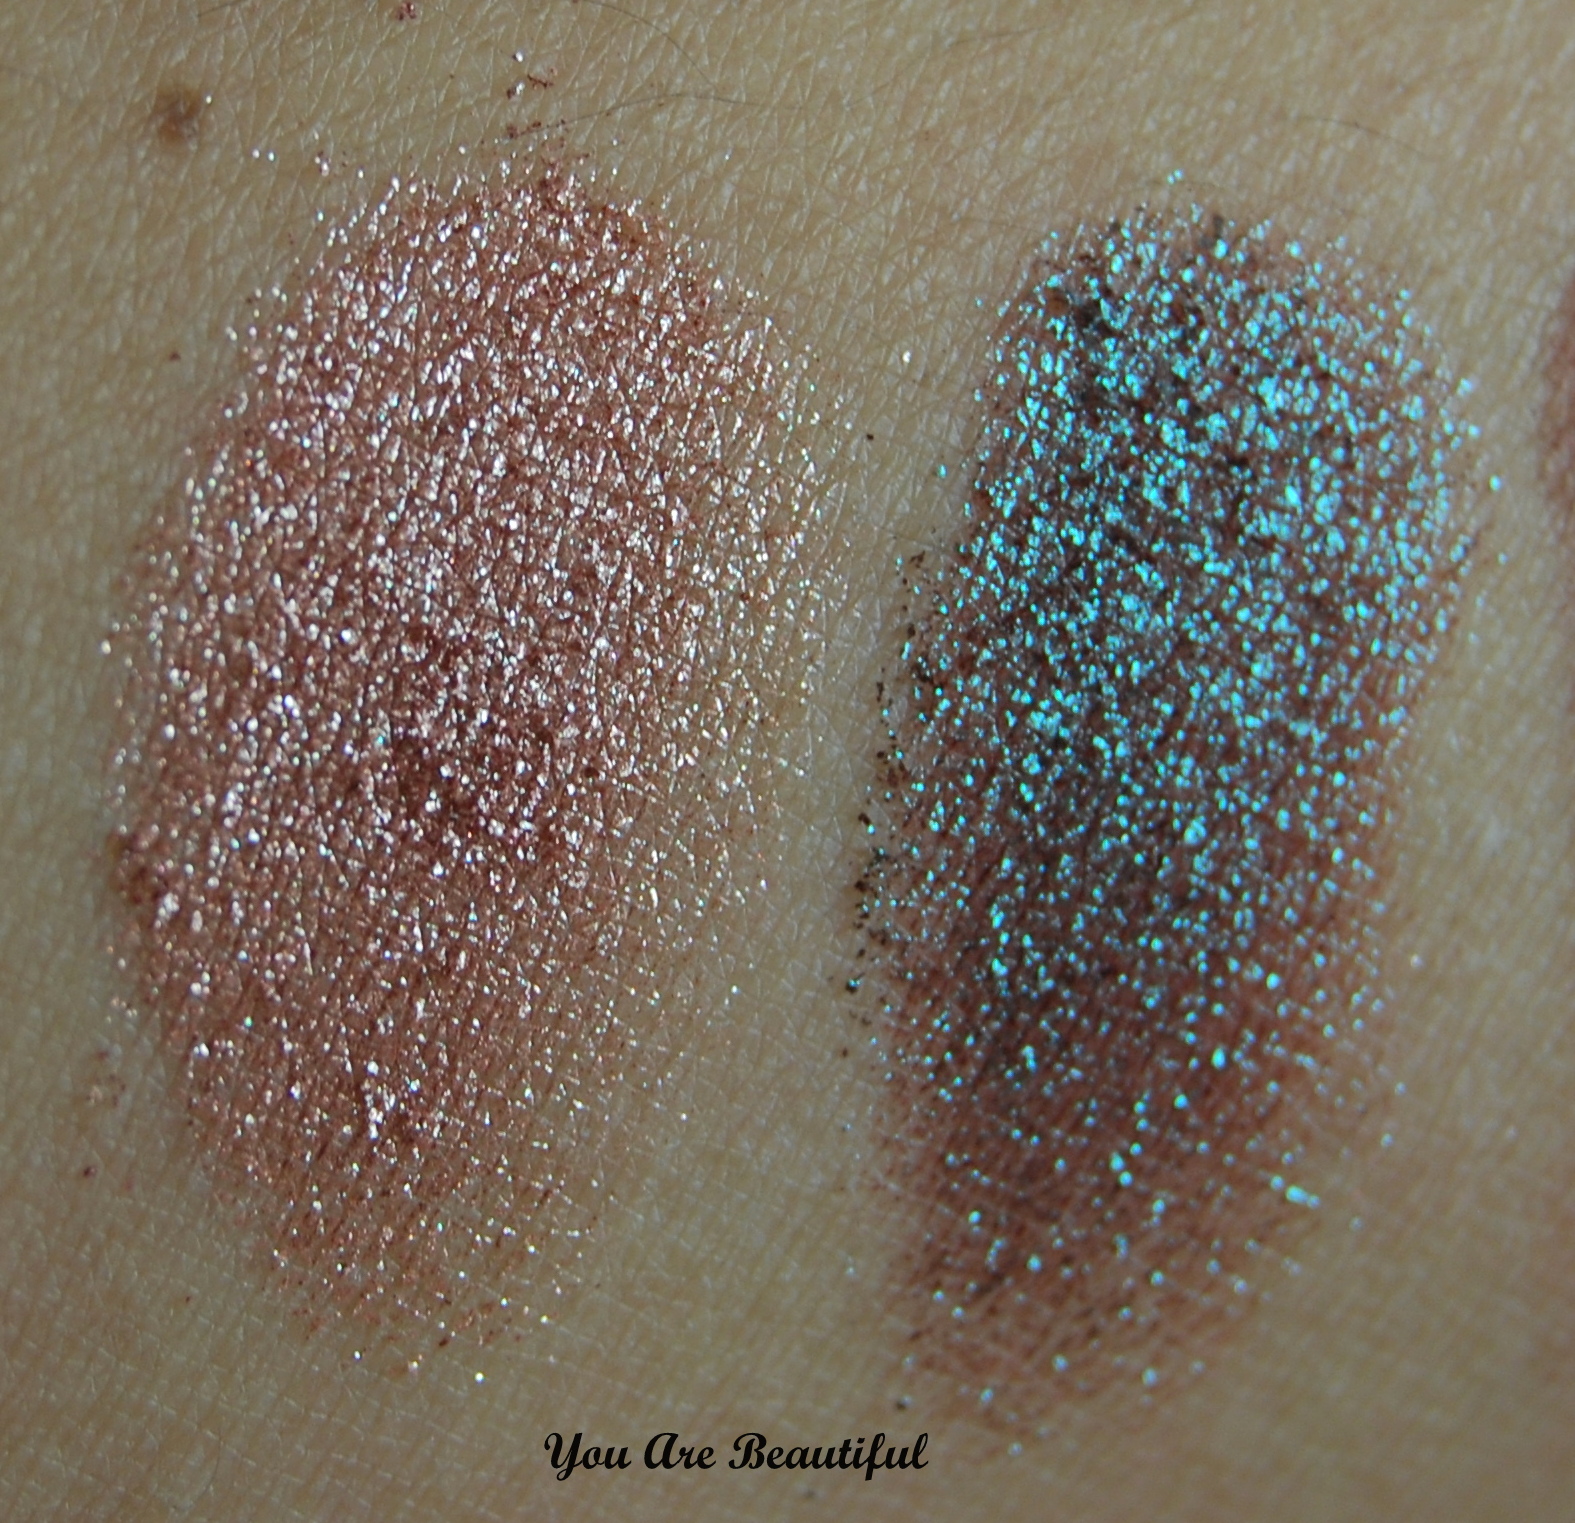
From L to R : MAC Foley, Embark, Twink

From L to R: MAC Pigment Tan and Blue Brown
Do you plan to do something special this Diwali or this festive season? We plan to have a lots of food, sparkles and decorating the house with lights.
Real Technique Blush Brush
As a makeup addict, you can never have enough makeup brushes. You are always one short of having your collection complete.
So, when I saw that the much loved Real Technique brushes were available on iHerbs, I knew I had to get them.
Of the few RT brushes that I bought, the blush brush and the buffing brush were the standout. Being made of synthetic taklon bristle they are incredibly smooth.
I was particularly in need of a blush brush since the once I was using previously was shedding badly. In case you are wondering, it was a Sigma brush.

The brush is very soft and picks up perfect amount of color. The size of brush handle makes it easy to handle. And don’t underestimate the benefits of the flat base of the handle. The self standing feature comes real handy if you have a toddler trying to take everything from your makeup drawer.
The brush is also very easy to clean and less drying time considering the density of the brush. I have washed the brush couple of times, but haven’t noticed much of shedding.
With a price tag of $9.99 AUD on iHerb, its a complete winner. I have been using it daily and can’t recommend it enough.
DIY : Easy Oil Cleansing Method
Reading Sarah and Jenny DIY success, I was tempted to try, but stayed away for 2 reasons. One, I am a lazy person, I sit on things till they don’t become absolute necessary. My husband terms this as my ‘launch time’ 😉 And second reason is that I am terrible at following a recipe. Read through and you will know what I mean.
One day I plucked courage and placed my order on SEA. The first item, I wanted to try was Sarah’s Easy Oil Cleansing recipe. So, I referred to her blog and prepared the Easy Oil Cleanser. But only after 2 uses, my skin was all flaky, irritated and dry. I reviewed the ratio I used and what was mentioned on the blog. Oh no!! I had used the oily skin proportions instead of the dry skin. In case you are wondering, I have dry sensitive skin. All kind of expletives were uttered. See, what I meant about my inability to follow a recipe.
Anyways, I took a deep breath and adjusted the proportion so that I achieved the ratio for dry skin. That day, I was glad that I had paid attention to my Maths classes.
Even with the adjusted ratio for dry skin, I was not entirely happy. This, I partially blame to my careless first attempt. After discussion with Sarah on twitter, I reduced proportion of Castor Oil in my mix.
So, now I use following ratio
Polysorbate 80 : Castor Oil : Oil = 2 : 0.25 : 7
Eg: Polysorbate 80 = 8 gm
Castor Oil = 1 gm
Oil = 28 gm

For oil, I have used Rosehip and Jojoba. Once I got the recipe right, I can safely say that it’s the best cleanser I have ever tried. It doesn’t require double cleansing but still removes all makeup, dirt and dead skin. I just warm it within my palm, massage it all over my face and then wash with warm water. It feels so clean without the dry, stretchy feeling. What really, made me a believer was the change in skin on my nose. For longest, I can remember, my nose has been an issue. On its own, it would be oily with dirt trapped in pores and rough skin. I had tried everything from nose strips to exfoliant but nothing worked. I had come to term with it, till I tried this cleanser. After using it for almost 2 months continuously, skin on my nose is relatively better. It’s no longer oily and the pores have cleared too. With skin being cleaner and less dry means that the makeup also sets well. Foundation looks less patchy and make up looks more natural.
After this experience, I am a DIY convert. It’s not very difficult, just needs a bit of attention when following the recipe.
Have you ever DIYed skin care? How was your experience?
Note: Just like everything else, skincare that works for me, may or may not work for others.
Bourjois Color Boost
When Clinique launched their Chubby Sticks, there was an surge in launch of similar products by drugstore brands. Some excelled in their value for money and some had exceptional pigmentation.
Correct me if I am wrong, but Bourjois is the last brand to launch a “lipstick crayon”. The wait was definitely worth it because its one of the best out there. They have named it as Colour Boost and have released only 4 shades.
• Red Sunrise
• Fuschia Libre
• Peach On the Beach
• Orange Punch
I picked “Orange Punch” during one of my innumerable trips to Priceline. I couldn’t wait to wear it, so there is no product photo for it.

It’s a more of coral than orange on my pigmented lips. The pigmentation of the “lipstick crayon” is quite good( but it’s not opaque in one swipe) and staying power is also good. The formula is non-drying and has shine to it. It feels extremely light on lips, almost as if it has melted giving that incredible juicy colour.

Have you tried any of the Color Boost? What are your thoughts on them? Personally, I can’t wait to pick more colours.
Maybelline Color Tattoo
Thanks to Yishan, I got a chance to try the latest addition to Maybelline Color Tattoo. Today, I will share my picks from the collection.
Being always short on time, I am always on look out of cream eye shadows which can help me achieve polished look. When I saw Barely Branded, I knew it fit the bill perfectly. A soft champagne colour which can be used on its own as lid shade(blended out well) or inner eye corner colour.


I have always wanted to try pink eye shadows but all that I have used till now make me look horrible. It was like, I wanted to love them but ended hating them. This was till I swatched Maybelline Inked in Pink Color Tattoo. It looks frosty in pan but doesn’t come across when worn. Initially, I was wary if it would work on my skin tone, but this shade has enough warmth in it to look good on olive tone skin.


I loved Maybelline Color Tattoo Electric Blue even before I swatched it. Its smooth, pigmented and so easy to work with it.


Maybelline Color Tattoo last well with base but on its own they last 2-3 hours without creasing. With the range of color and texture Maybelline offers, I don’t mind using them with a base. I will definitely be trying more when new colors are launched.
Have you tried these? What do you think of them?
Lips Exfoliation
We all know that exfoliation is an important step in skin care routine. Just as we exfoliate the skin on our face and body, lip exfoliation is also needed to get smooth lips. At least, that’s what I think
There are many lip scrubs available in market for this purpose but personally I am not very fond of those. Apart for shelling out extra dollars for something which can be achieved easily, they are harsh for the soft skin on our lips.
So, how do I exfoliate my lips?? All I use is a heavy duty lip balm like Lanolips( I use Dr Lipps) and the trusty, always present q-tip.


Every night before I sleep, I apply tiny amount of Dr Lipps on my lips. What this does is that it softens the dead skin and the flaky bits while moisturising the lips. While washing my face next morning,all I need to do face is to wet the q-tip and move in on my lips in circular motion. This picks up all the dead skin and reveals the soft skin.
Once exfoliated, I follow it with Nivea lip butter.

How do you exfoliate your lips ?
Burberry Eyeshadows : Midnight Brown & Porcelain
Burberry eye shadow singles, are just what you would expect from a high end make up brand.
You fall in love with them all over again, every single time you use them.
I am naturally drawn towards warm shades like brown,taupe, so it was no surprise when I chose Midnight Brown.
Burberry Midnight Brown is a dark brown with shimmer and red undertone. I use this mainly as the shade for outer 2/3rd of my eyelid area and as socket colour
Even though it’s quite warm, I think it would look quite good on cool tone skin.

My choice for Porcelain was mainly driven by the fact that I wasn’t happy with highlighting eyeshadows in my collection.
Burberry Porcelain is just what its name is. A beautiful highlight shadow with enough warmth to work on warm skintones.
Most of the highlighting shades I have come across, appear frost like on my lids. But, not this one.


Both the eyeshadows, are pigmented, soft and easy to work with. Just wish that they cost little less
Have you tried any of the Burberry eye shadow singles? What do you think of them ??
Savvy Orange Envy
One of the many reasons that I have countless nail paints is that if I see someone wearing a color, I try my best to get its closest match. So, I wasn’t surprised when I saw someone wearing a bright neon orange nail paint and the little voice in my head said “pretty !! you don’t have this color. Your mission is to find it’s match, should you accept”
My first stop was Priceline and I wasn’t disappointed in my search. There in the bargain bin was the color I was looking for, Savvy Orange Envy. Its a bright neon orange color without any shimmer. A perfect spring/summer color. Consistency wise its runny but doesn’t streak and needs only 2 coats to achieve opacity.


I would say for $3 its a great find. Have you tried any of the Savvy nail paints ? Do you also buy nail paints when you see some one wearing it ??
Chanel Illusion D’Ombre Emerveille` 82
I already loved my Chanel Illusion D’Ombreso when I saw Pixiwoo sisters recreate a celebrity look using Emerveille, it entered my never ending wishlist ( the one where everytime I strike off one, 5 new items take the place !!!)
When I swatched it in store, I knew I had to take it with me. Its peachy beige with very small shimmer and like all D’ombres swatch very smooth. I have lost count of people to whom I have recommended this beauty. Its the most used eyeshadow in my stash.

Its easy to use, if in rush all you need is clean fingers to apply it as an allover eyelid color for an instant polished look. Since I have been very time poor this comes handy in my looks as it requires minimum effort.
I use it as
- As an base eyeshadow color. It provides radiance to other shadows in the look
- On its own with heavy eyeliner
- On its own and with dark color in crease and flick of an eyeliner
It has never failed me. Perfect
